<?xml version="1.0" encoding="utf-8"?><feed xmlns="http://www.w3.org/2005/Atom" ><generator uri="https://jekyllrb.com/" version="4.4.1">Jekyll</generator><link href="/feed.xml" rel="self" type="application/atom+xml" /><link href="/" rel="alternate" type="text/html" /><updated>2026-06-30T00:26:25+00:00</updated><id>/feed.xml</id><title type="html">Michael Chabot</title><subtitle>Write an awesome description for your new site here. You can edit this line in _config.yml. It will appear in your document head meta (for Google search results) and in your feed.xml site description.</subtitle><entry><title type="html">Unity Snow Shader</title><link href="/posts/snow-shader/" rel="alternate" type="text/html" title="Unity Snow Shader" /><published>2026-06-29T00:00:00+00:00</published><updated>2026-06-29T00:00:00+00:00</updated><id>/posts/snow-shader</id><content type="html" xml:base="/posts/snow-shader/"><![CDATA[<h1 id="snow-effect">Snow Effect</h1>

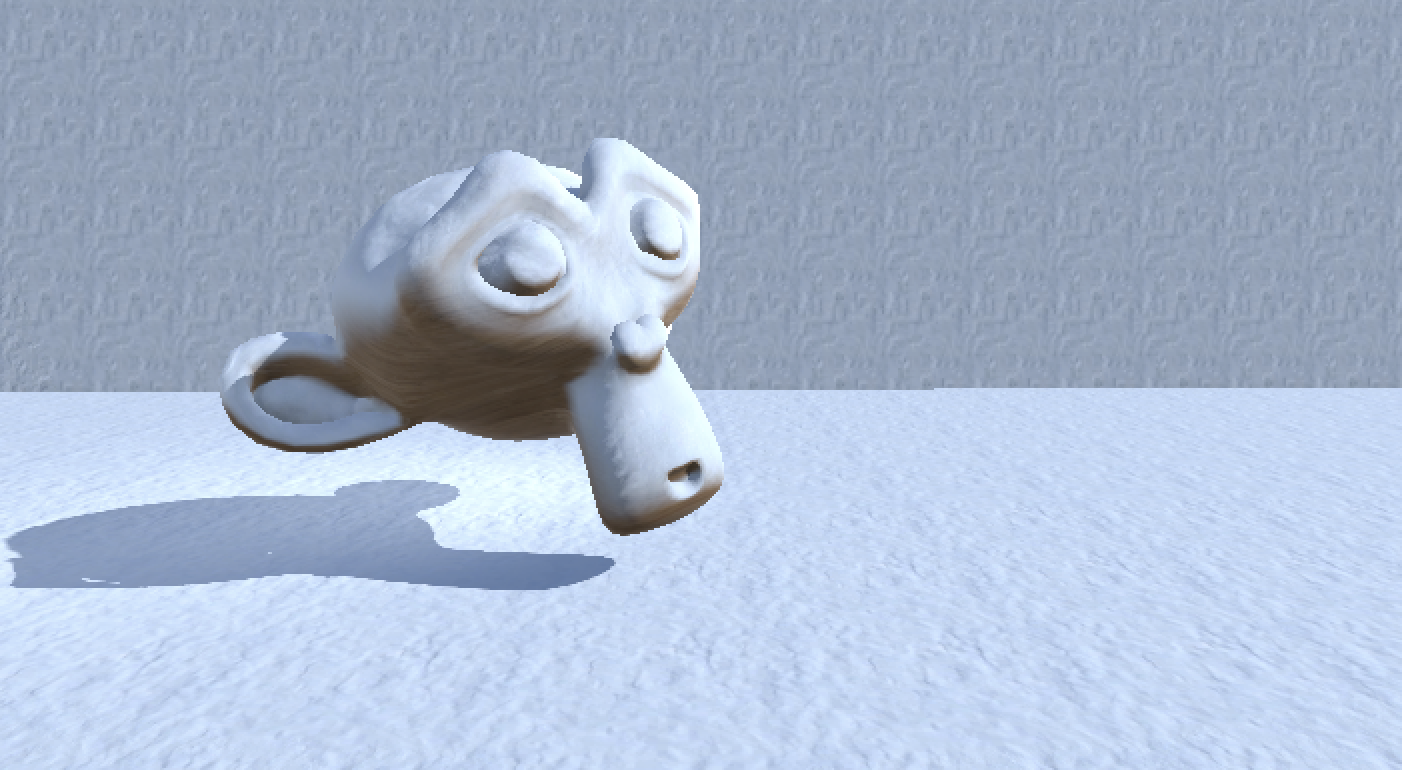
<p>The snow shader adds a top snow dusted appearance:</p>

<p><img src="/assets/images/2026-06-snow-shader/snow_effect.png" alt="Outline Effect" /></p>

<div class="video-container" style="margin: 1.5rem 0; width: 100%;">
  <!-- <video controls  preload="metadata"> -->
  <video controls="" muted="" playsinline="" style="width: 100%; max-width: 720px; display: block; margin: 0 auto;">
    <source src="/assets/images/2026-06-snow-shader/snow_demo.mov" type="video/mp4" />
    Your browser does not support the video tag.
  </video>
  
    <p class="video-caption" style="text-align: center; font-style: italic; font-size: 0.9rem; margin-top: 0.5rem; color: #666;">
      Demonstration of the Different Attributes
    </p>
  
</div>

<h2 id="overview-of-the-graph">Overview of the graph</h2>

<h2 id="parameters">Parameters</h2>
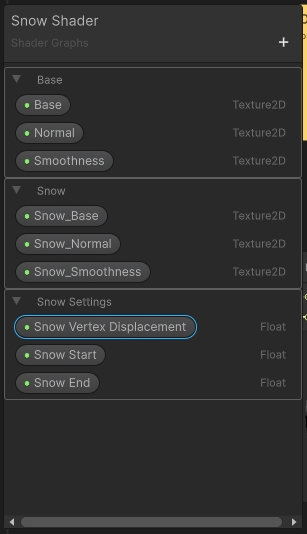
<p>It supports a couple of parameters to drive how much snow will be on the model.</p>

<p>Snow Start: A value from 0..1 of where the snow will start lerping / appearing.</p>

<p>Snow End: A value from 0..1 of where the snow will finish lerping.</p>

<p>Everything else is different textures for the base / snow effect.</p>

<p><img src="/assets/images/2026-06-snow-shader/snow_params.png" alt="Params" /></p>

<h2 id="graph-setup">Graph Setup</h2>
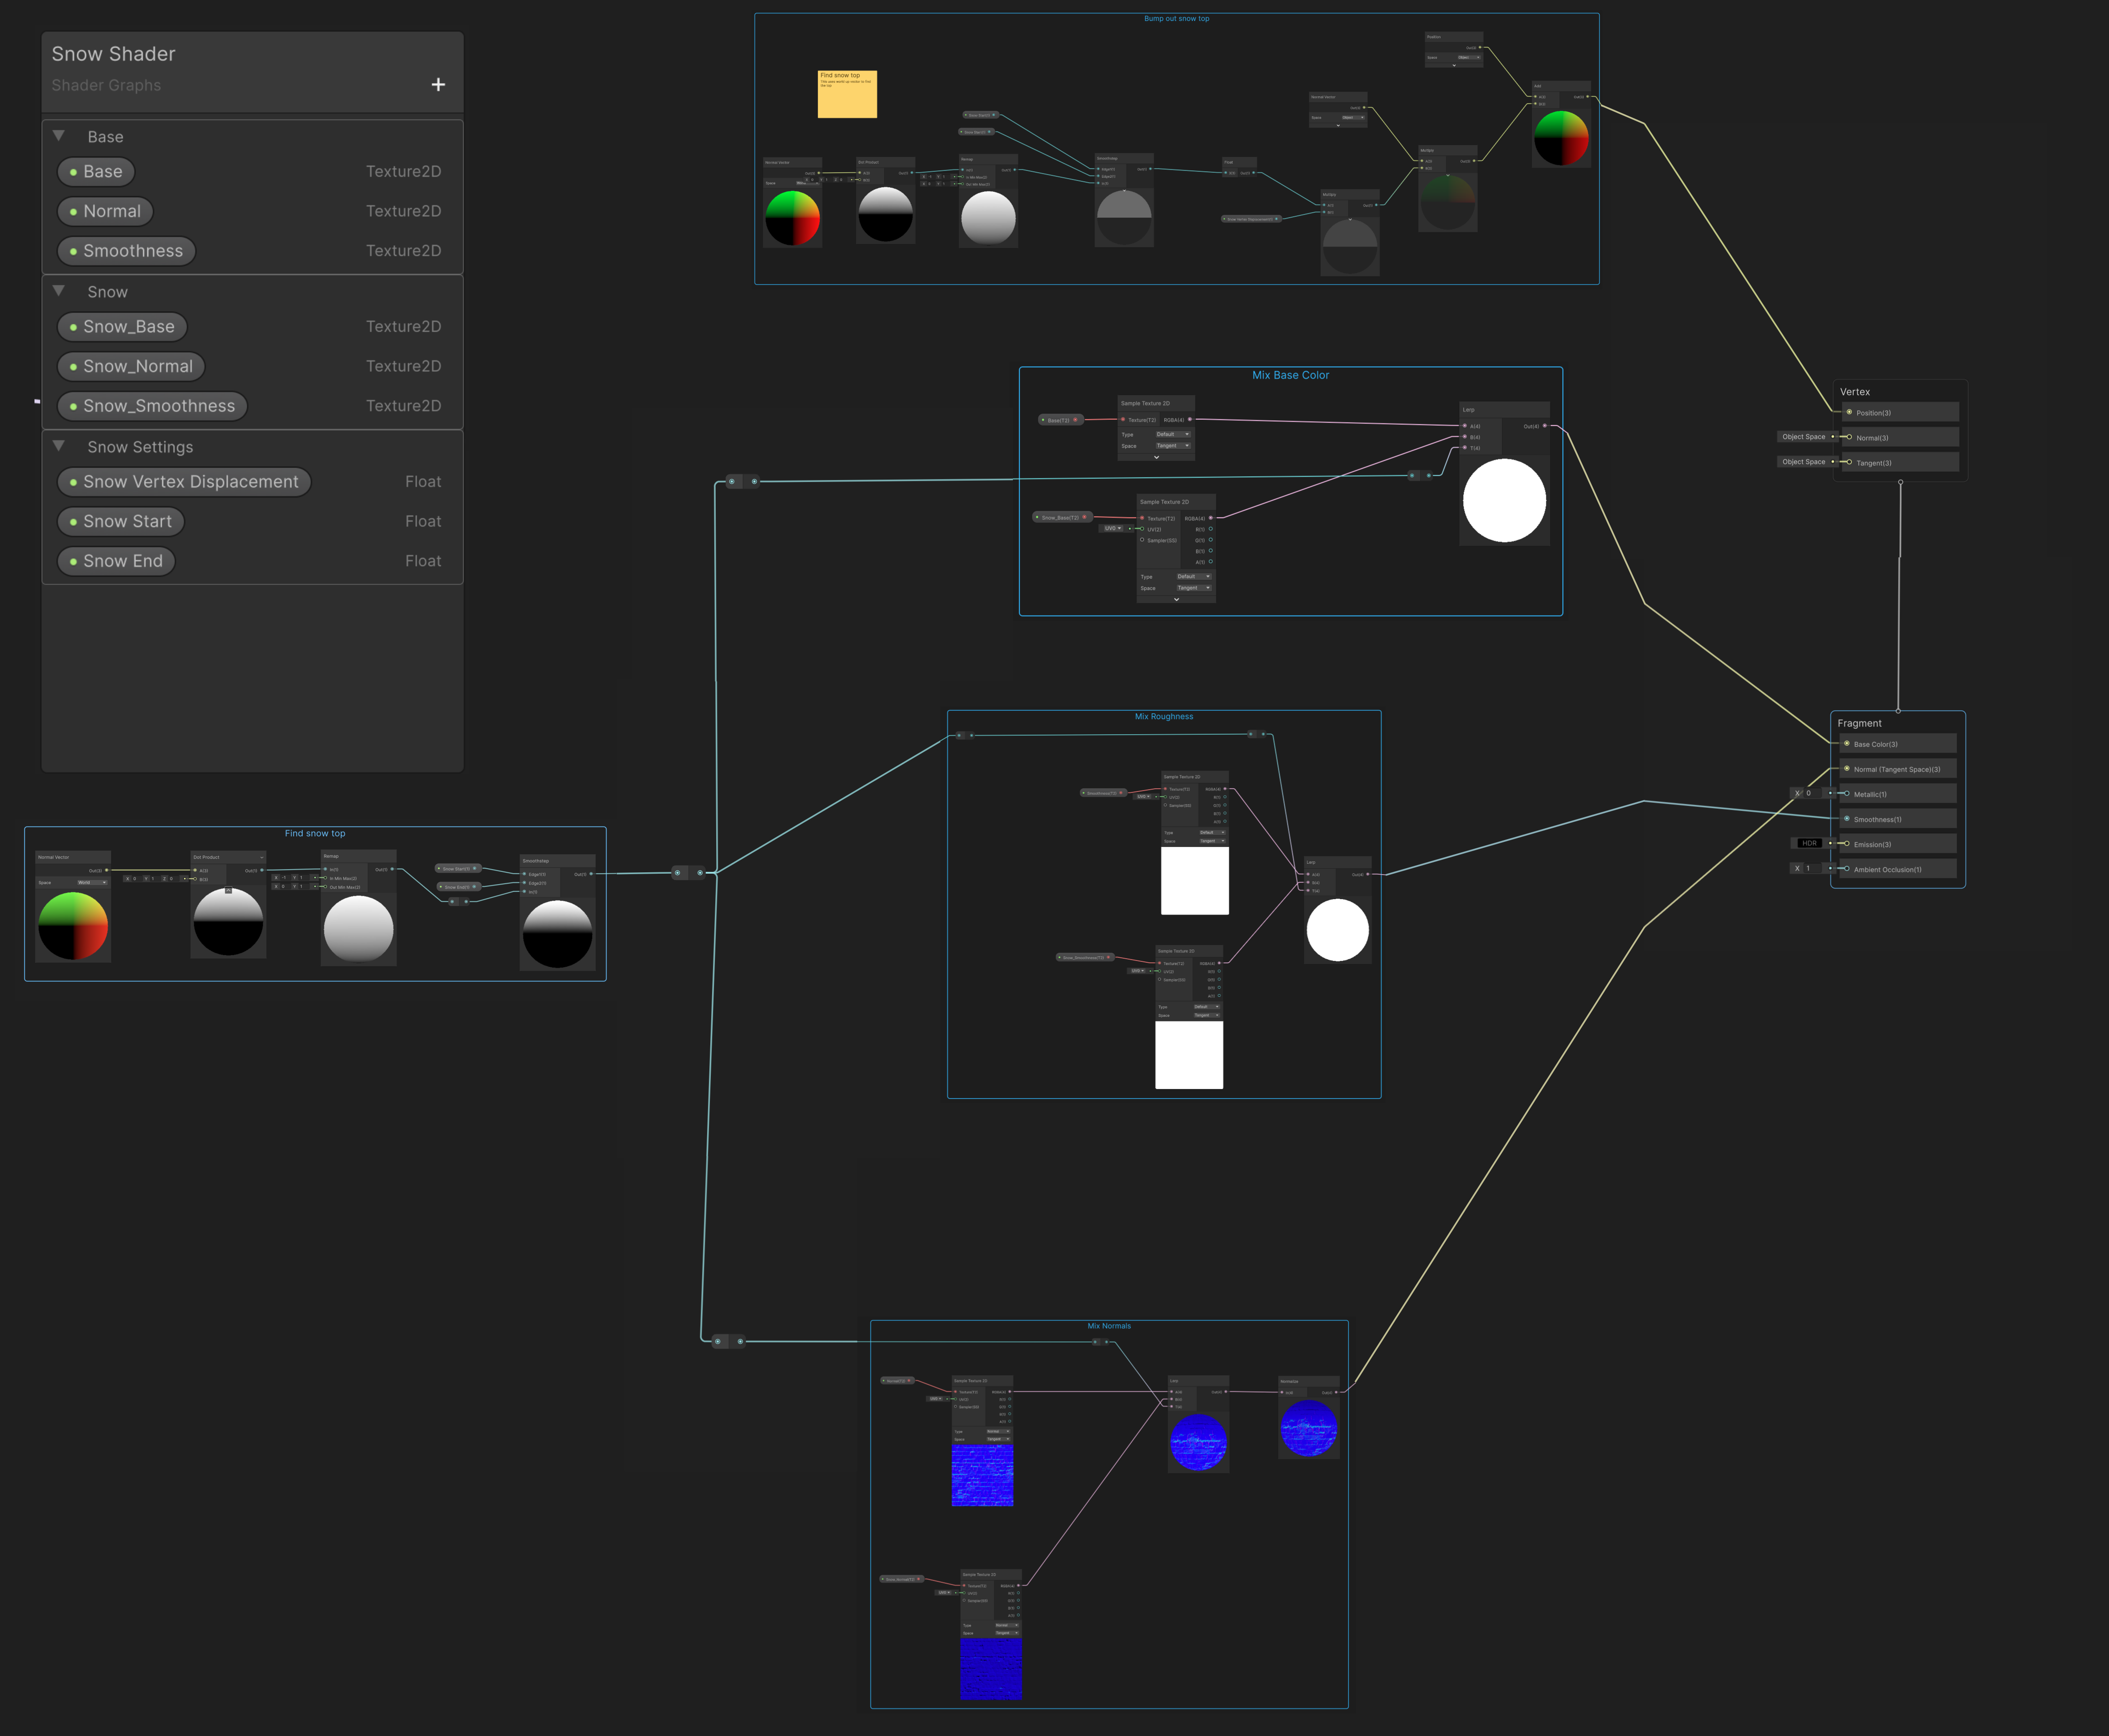
<p><img src="/assets/images/2026-06-snow-shader/graph_full.png" alt="Full Graph" /></p>

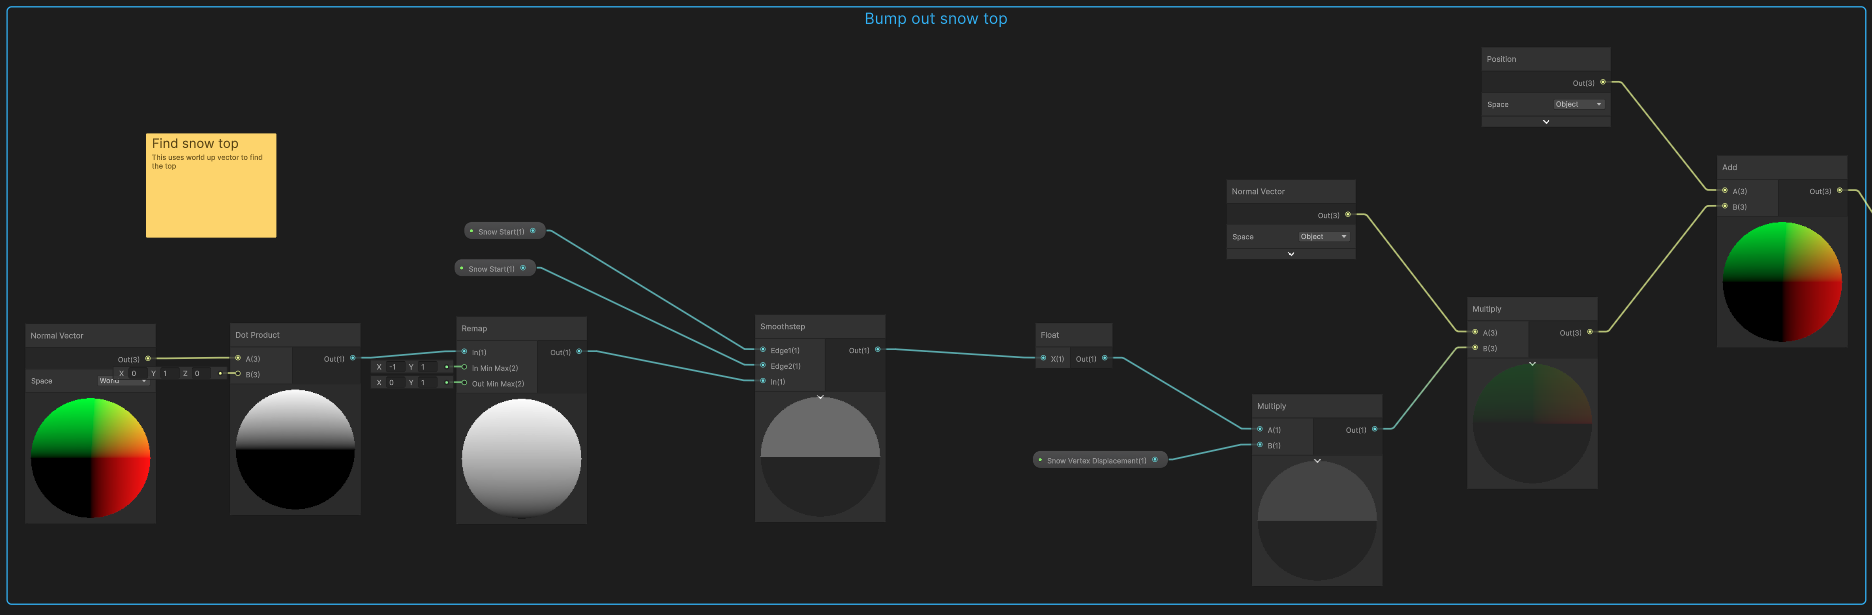
<h2 id="creating-the-top-mask">Creating the top mask</h2>

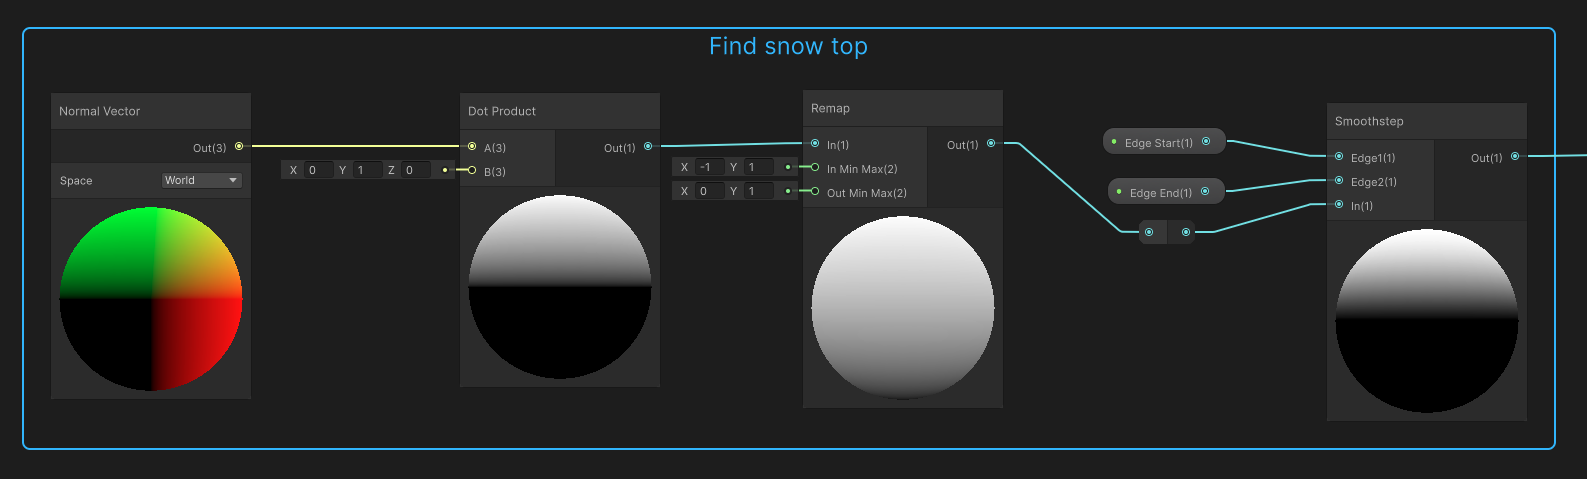
<p>Using a normal vector configured to world with a dot product and Vector3.up works well to get the top mask.</p>

<p>The only issue is that this will of course return [-1, 1] since that is the range of the <a href="https://en.wikipedia.org/wiki/Dot_product">dot product</a>.</p>

<p>The remap node is a handy node in this case, remapping the output from [-1, 1] to [0, 1]</p>

<p>Right now we don’t have any control over where the snow actually goes. You can see from the remap node that it is a smooth gradient from 0 to 1 from bottom to top. To turn it to a point where we have black where we don’t want snow and white where we do, the <a href="https://docs.unity3d.com/Packages/com.unity.shadergraph@6.9/manual/Smoothstep-Node.html">smoothstep</a> node is great.</p>

<p>It takes a minimum value and returns 0 for anything under it, and 1 for everything above a max value. It does an interpolation between min and max otherwise.</p>

<p><img src="/assets/images/2026-06-snow-shader/find_snow_top.png" alt="Smooth Node" /></p>

<h3 id="dot-product">Dot Product</h3>

<p>Since we are doing a dot product with the global Vector3.up. The dot product of 2 vectors will be 1 if they are facing the same direction, -1 if they are facing opposite, and 0 if they are 90 degrees from each other.</p>

<p>Note the geometric definition of a dot product is:</p>

\[A \cdot B = \lVert A \rVert \lVert B \rVert \cos(\theta)\]

<p>Since we are dealing with normalized vectors, $\lVert A \rVert$ and $\lVert B \rVert$ will both be 1.</p>

\[A \cdot B = \cos(\theta)\]

<p>This site has a nice visualization: https://maththebeautiful.com/dot-product/</p>

<h2 id="mixing-a-second-material">Mixing a second material</h2>

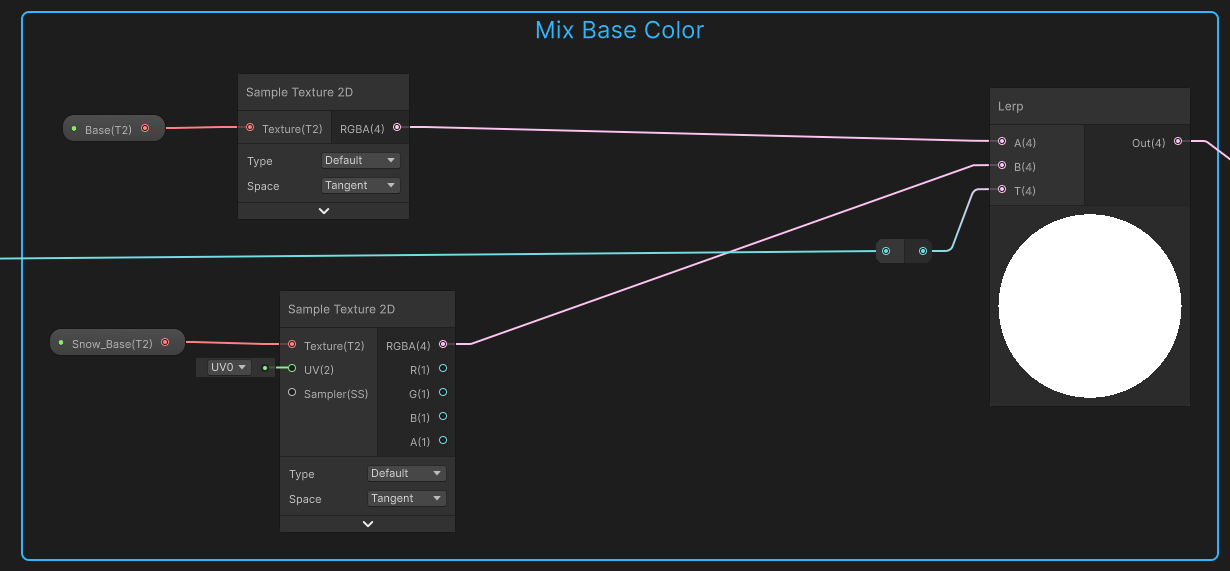
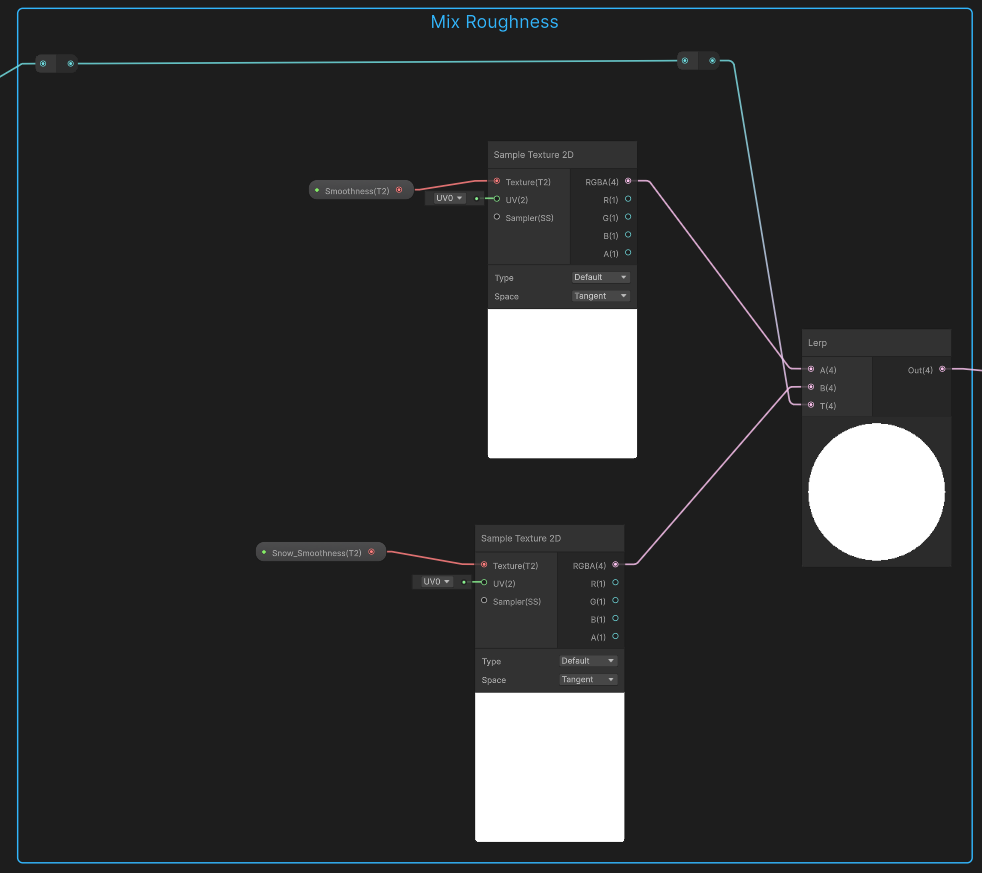
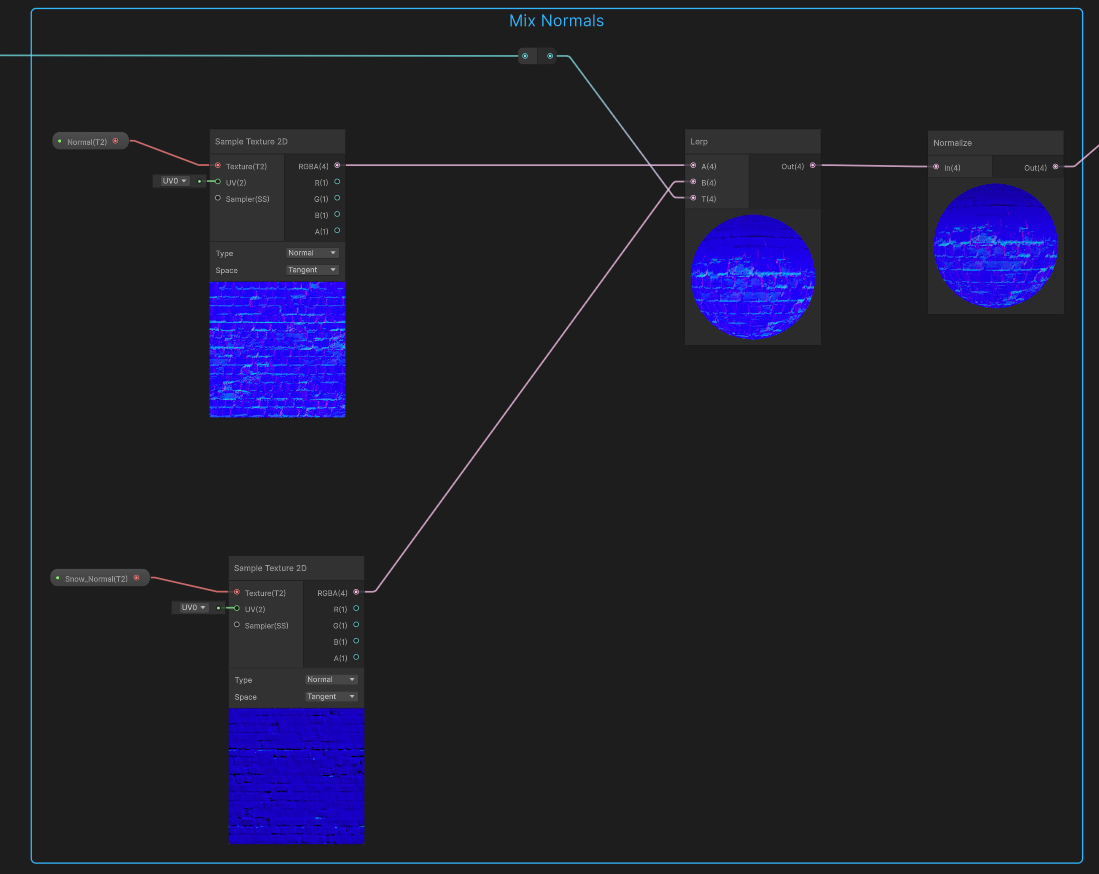
<p>Since the snow will be mixed with two materials, a base and a snow a little bit of effort has to be put into the mixing. Here is the base, roughness and normal mixing.</p>

<p><img src="/assets/images/2026-06-snow-shader/mix_base_color.png" alt="Base Color" /></p>

<p><img src="/assets/images/2026-06-snow-shader/mix_roughness.png" alt="Roughness Blending" /></p>

<p>Both color and roughness are the same node setup. I think there is not much to say about them other then the “T” value comes from the smoothstep discussed above.</p>

<p><img src="/assets/images/2026-06-snow-shader/mix_normals.png" alt="Normal Blending" /></p>

<p>A little bit of care has to be taken when lerping normals. The normals have to be normalized after the lerp.</p>

<h1 id="vertex-movement">Vertex movement</h1>

<p>This graph uses a little bit of vertex movement to get the snow pushing out ontop effect. Each of the vertexs will be moved along its normal to sort of poof out the snowy parts of the object. There is a requirement to have enough vertex density for the effect to make sense!</p>

<p><img src="/assets/images/2026-06-snow-shader/vertex_movement.png" alt="Vertex Movement" /></p>]]></content><author><name></name></author><category term="unity" /><category term="unity-shader-graph" /><category term="node-smoothstep" /><category term="node-remap" /><category term="shader" /><summary type="html"><![CDATA[Snow Effect]]></summary></entry><entry><title type="html">Working with normal spaces</title><link href="/posts/converting-between-normal-space/" rel="alternate" type="text/html" title="Working with normal spaces" /><published>2026-06-25T00:00:00+00:00</published><updated>2026-06-25T00:00:00+00:00</updated><id>/posts/converting-between-normal-space</id><content type="html" xml:base="/posts/converting-between-normal-space/"><![CDATA[<h1 id="a-catalog-of-different-normal-spaces">A catalog of different normal spaces</h1>

<p>Part of the motivation of this thinking is that in godot the NORMAL comes in view space by default:</p>

<div class="language-plaintext highlighter-rouge"><div class="highlight"><pre class="highlight"><code>NORMAL (vec3): Normal that comes from the vertex() function, in view space. ...

INV_VIEW_MATRIX (vec4): View space to world space transform.


</code></pre></div></div>

<p>Convert from view space to world space</p>
<div class="language-plaintext highlighter-rouge"><div class="highlight"><pre class="highlight"><code>n_world_space = INT_VIEW_MATRIX * vec4(NORMAL, 0.0)
</code></pre></div></div>

<p>Convert from world space to local space</p>
<div class="language-plaintext highlighter-rouge"><div class="highlight"><pre class="highlight"><code>mat4 inv_model_matrix = inverse(MODEL_MATRIX);

vec3 n_local = (inv_model_matrix * vec4(n_world_space, 0.0)).xyz;
</code></pre></div></div>

<h2 id="working-with-vec3-and-vec4">Working with vec3 and vec4</h2>

<p>When working with some of these values we have to use a vec. There is a handy shortform:</p>

<div class="language-plaintext highlighter-rouge"><div class="highlight"><pre class="highlight"><code>vec4(vec3, value) which converts this to vec4(vec3.x, vec3.y, vec3.z, value);
</code></pre></div></div>

<p>To retrieve values, or convert down we have
<code class="language-plaintext highlighter-rouge">vec4().xyz</code> which will return a vec3.</p>

<h2 id="viewcamera-space">View/Camera Space</h2>
<p>View space (or camera space) shifts the center of the universe to the camera lens. While it is natural to assume the camera looks straight forward down the Z-axis, Godot’s right-handed coordinate system flips this logic. The positive Z-axis actually points backward out of the screen toward you, meaning the camera is technically staring down the negative Z-axis into your 3D world.</p>

<h2 id="world-space">World Space</h2>
<p>Think of world space as the master grid of your entire game level. It is the global, shared coordinate system where the origin (0, 0, 0) acts as the exact center of the universe. All transformations are calculated relative to this grid. If you place a cube at (5, 0, 3), you are defining its absolute location within the world, regardless of how the object itself is rotated or where the camera is looking.</p>

<h2 id="modellocal-space">Model/Local space</h2>
<p>Think of model space as an object’s personal, internal blueprint. The origin (0, 0, 0) is simply the pivot point of the mesh itself. Whenever you scale or rotate an object locally, you are manipulating it inside this specific space. A 3D cube might be placed a thousand miles away in the game world, but inside its own model space, its vertices still sit perfectly around its own center, ranging predictably from (-1, -1, -1) to (1, 1, 1).</p>

<h2 id="tangent-space">Tangent Space</h2>
<p>Normals point in the direction of the z-axis away from the face. Tangent space originates at the point on the polygon that it is being calculated at. The z-axis is point straight away from the mesh and the x,y are pointing perfectly flat along the polygon.</p>

<h2 id="links">Links</h2>
<ul>
  <li><a href="https://docs.godotengine.org/en/stable/tutorials/shaders/shader_reference/spatial_shader.html#fragment-built-ins">Godot - Fragment Built Ins</a></li>
  <li><a href="https://docs.godotengine.org/en/stable/tutorials/shaders/shader_reference/shader_functions.html#shader-func-inverse">Godot - inverse function</a></li>
  <li><a href="https://learnopengl.com/Advanced-Lighting/Normal-Mapping">OpenGL - Normal Mapping</a></li>
  <li><a href="https://github.com/godotengine/godot-docs-user-notes/discussions/218#discussioncomment-14980297">Github comment - ajhmain</a></li>
</ul>]]></content><author><name></name></author><category term="godot" /><category term="normal" /><category term="normal spaces" /><summary type="html"><![CDATA[A catalog of different normal spaces]]></summary></entry><entry><title type="html">XRay effect in Unity Shader Graph</title><link href="/posts/xray-effect/" rel="alternate" type="text/html" title="XRay effect in Unity Shader Graph" /><published>2026-06-17T00:00:00+00:00</published><updated>2026-06-17T00:00:00+00:00</updated><id>/posts/xray-effect</id><content type="html" xml:base="/posts/xray-effect/"><![CDATA[<h1 id="the-effect">The effect</h1>

<p>I am using Unity 6.4 LTS and URP for this project.</p>

<p>This is a simple effect that has an outline disolve. Its being used when an object is shown / hidden in a project.
It would be used for things like Sci-Fi spawn / despawn, xray vision / deactivation mode, ghostly transitions, etc.</p>

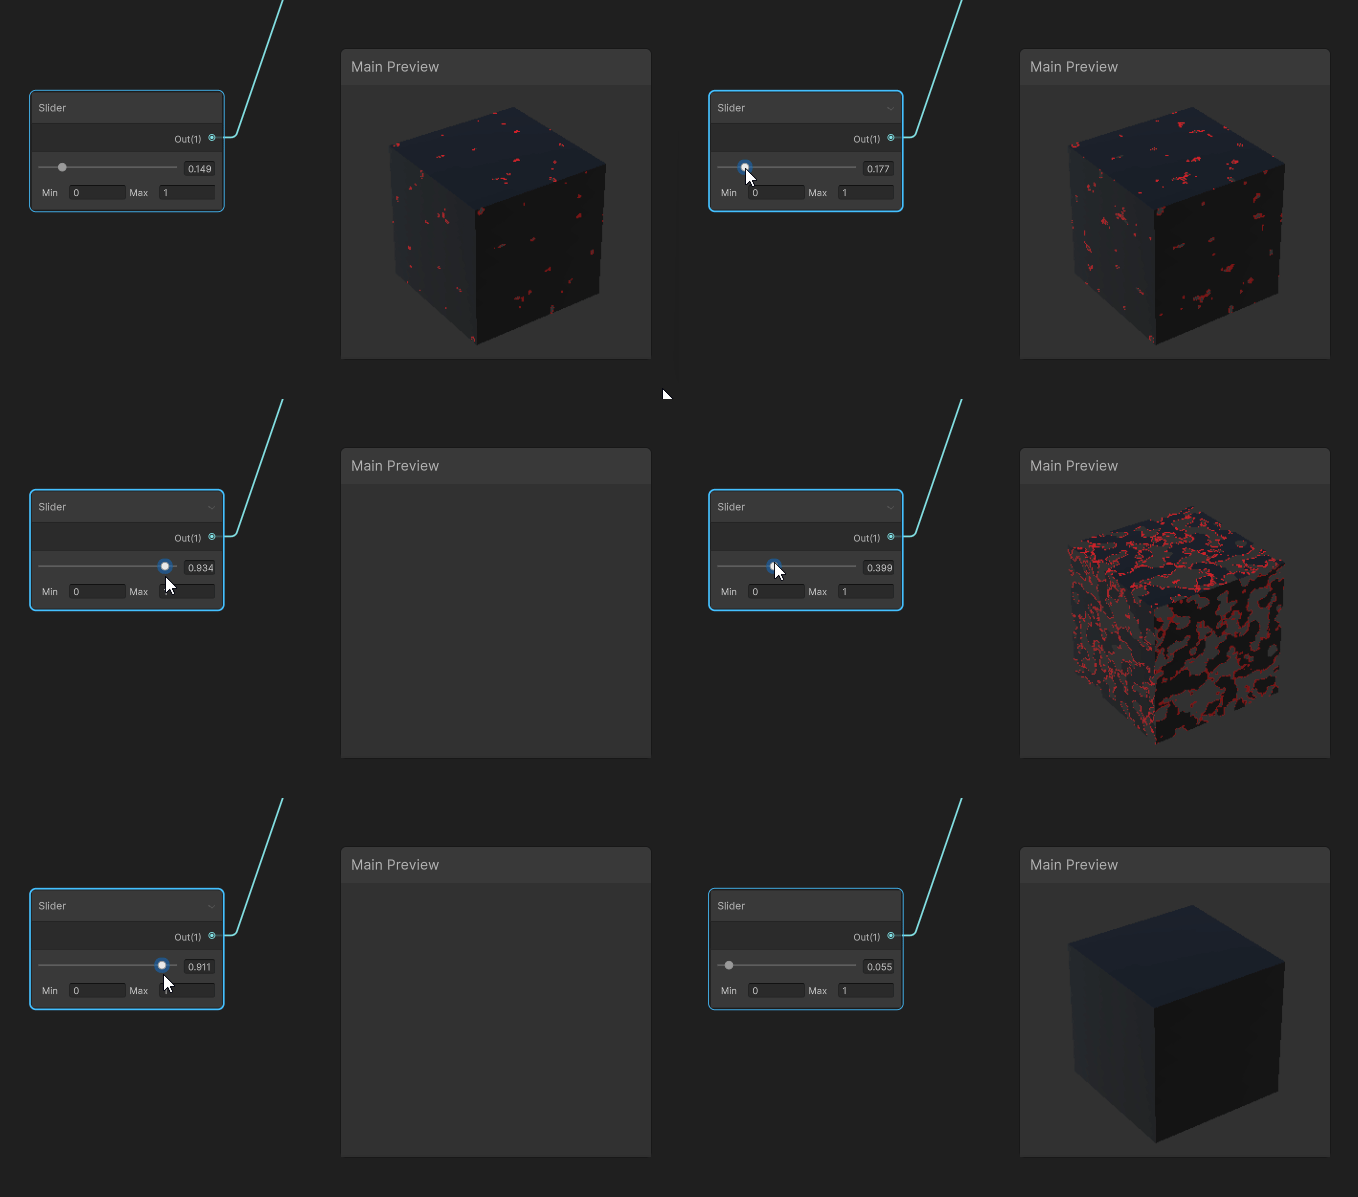
<p>Here is a sample with a slider placed into the shader graph, this slider is driven by a variable normally.</p>

<p><img src="/assets/images/2026-06-xray-effect/xray-full-effect.gif" alt="Outline Effect" /></p>

<p>Utilizing inputs we can customize the following elements:</p>
<ul>
  <li>Color</li>
  <li>Disolve Progress</li>
  <li>How thick the edge is</li>
  <li>Color of the edge</li>
</ul>

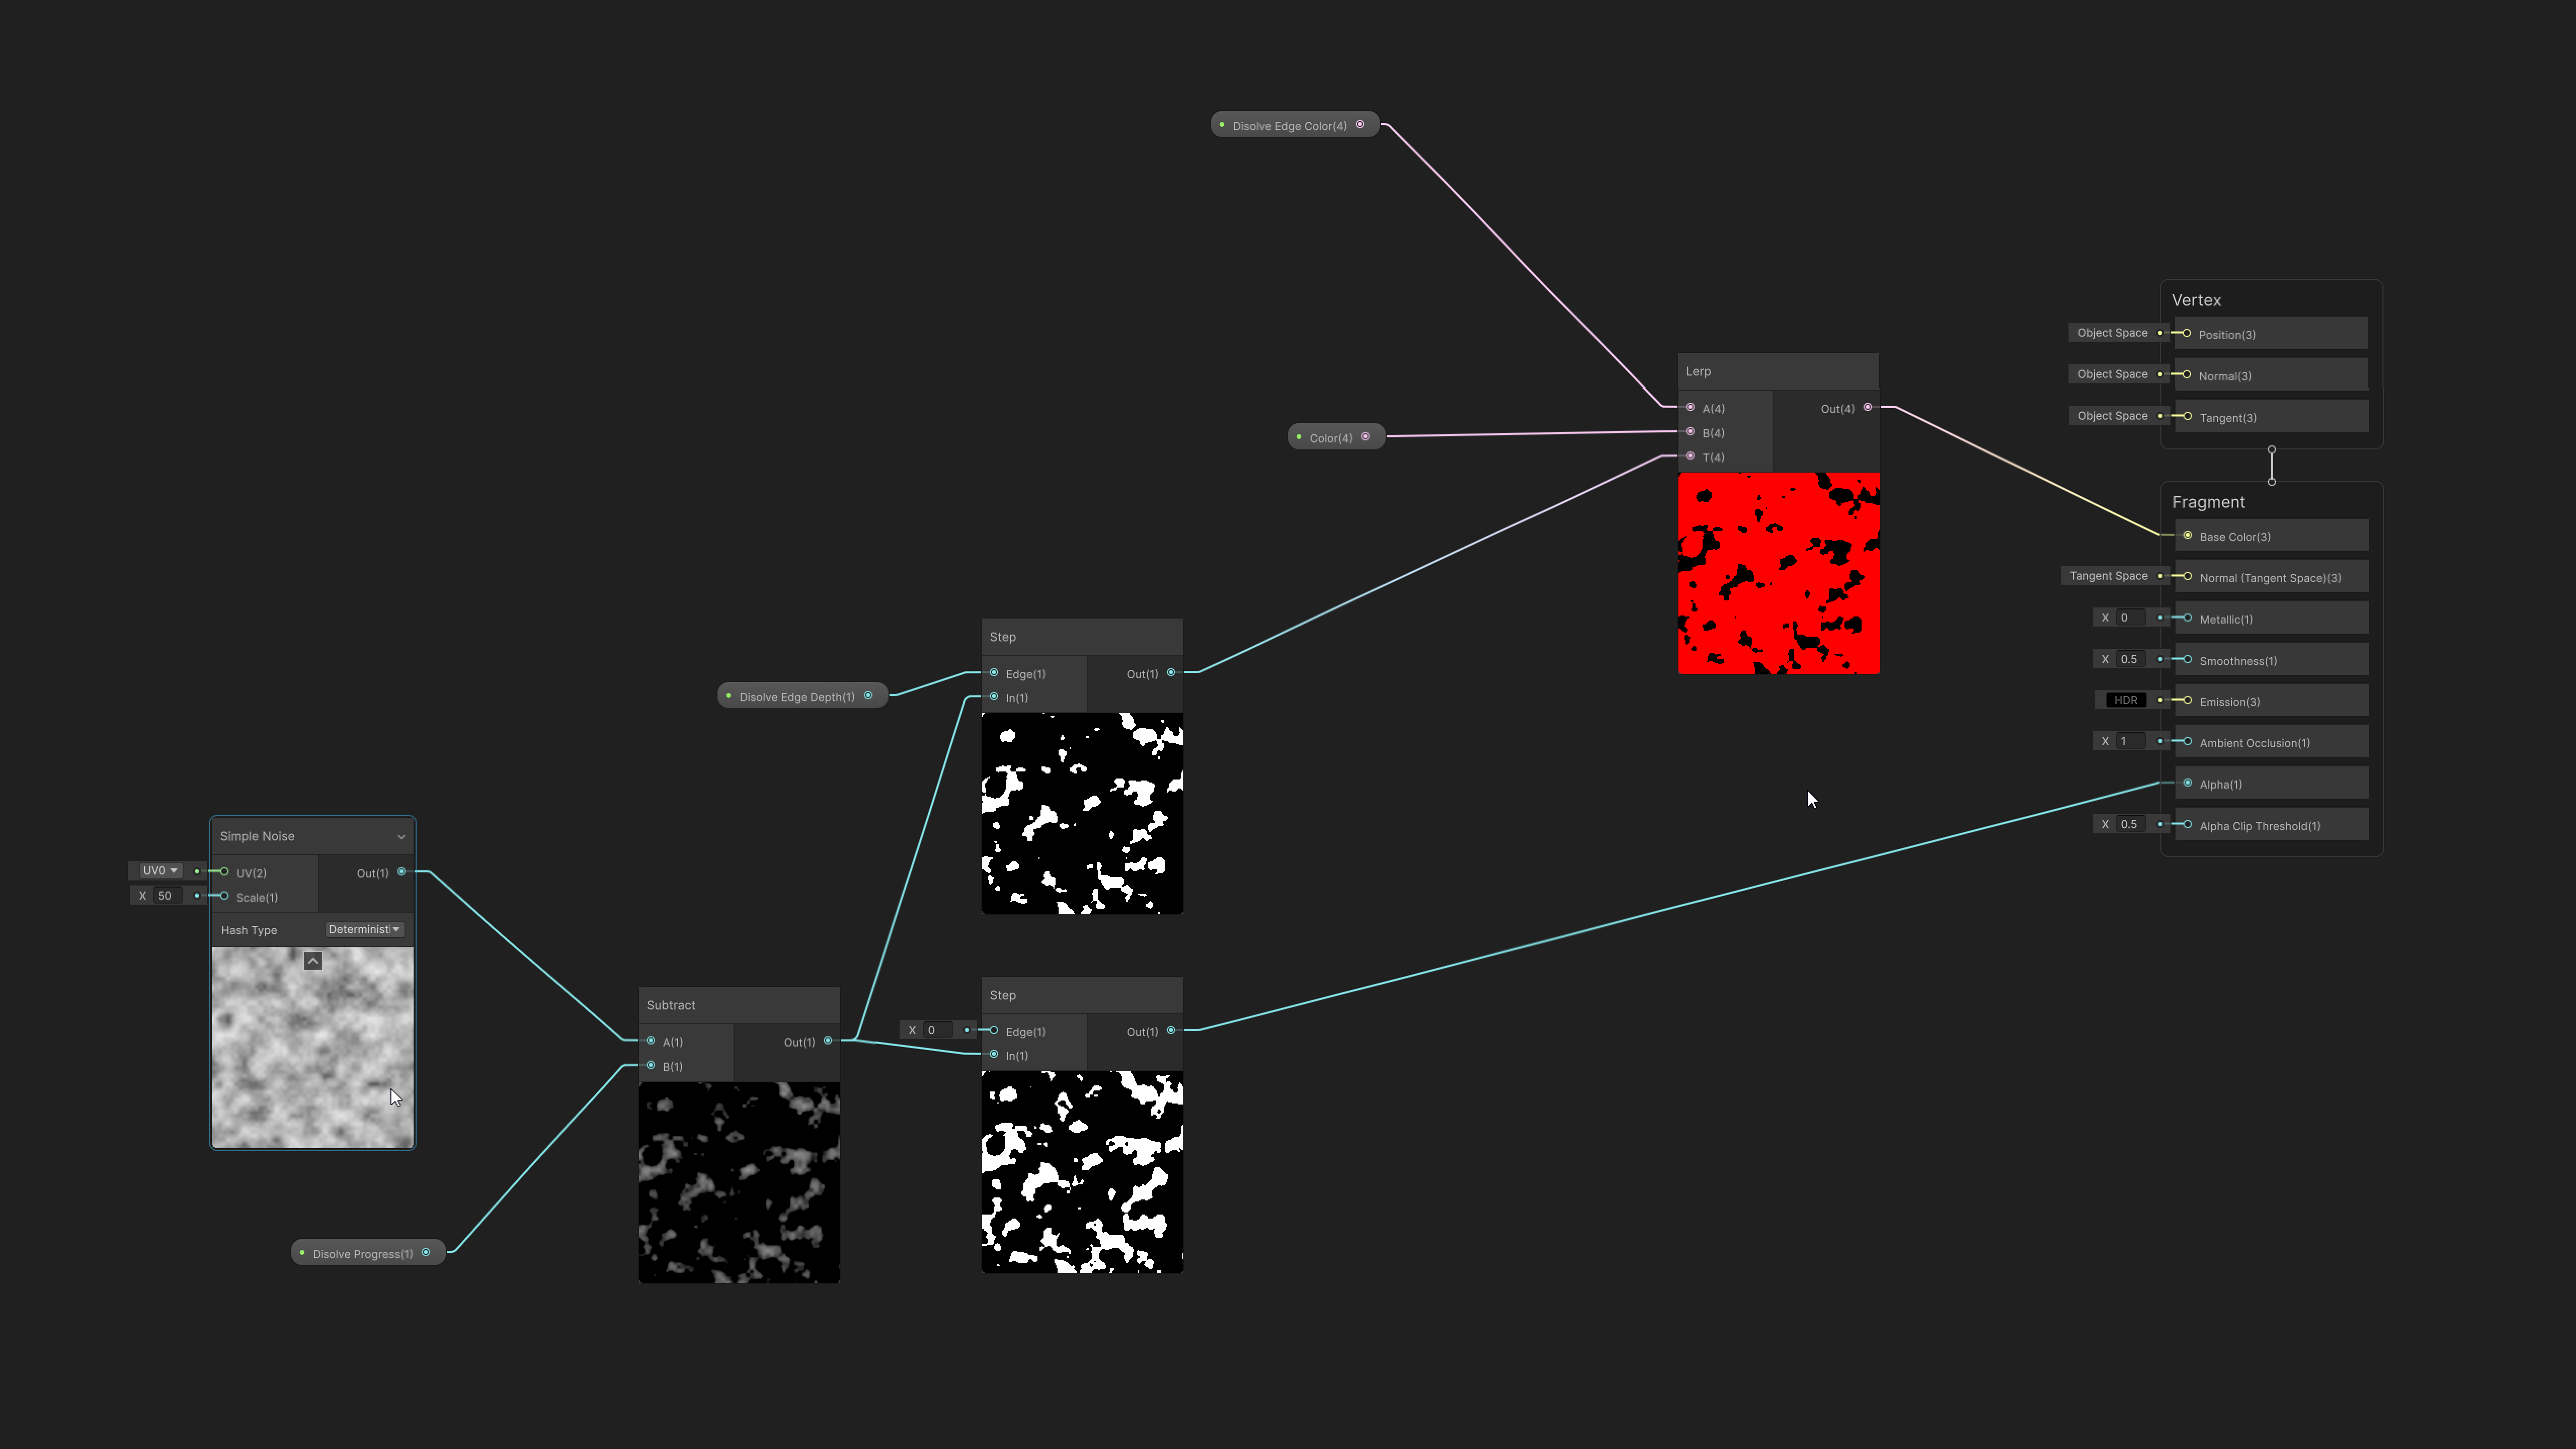
<h1 id="overview-of-the-graph">Overview of the graph</h1>
<p><img src="/assets/images/2026-06-xray-effect/xray-effect-full.png" alt="Shader Graph" /></p>

<h2 id="graph-setup">Graph Setup</h2>

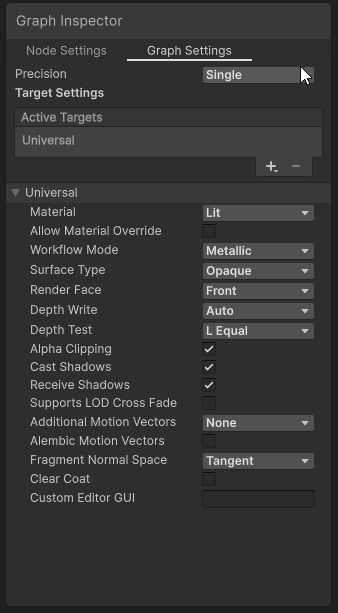
<p>Because we are using alpha clipping the shader must have alpha clipping enabled.</p>

<p><img src="/assets/images/2026-06-xray-effect/graph-settings.png" alt="Graph Settings" /></p>

<h1 id="step-node">Step node</h1>
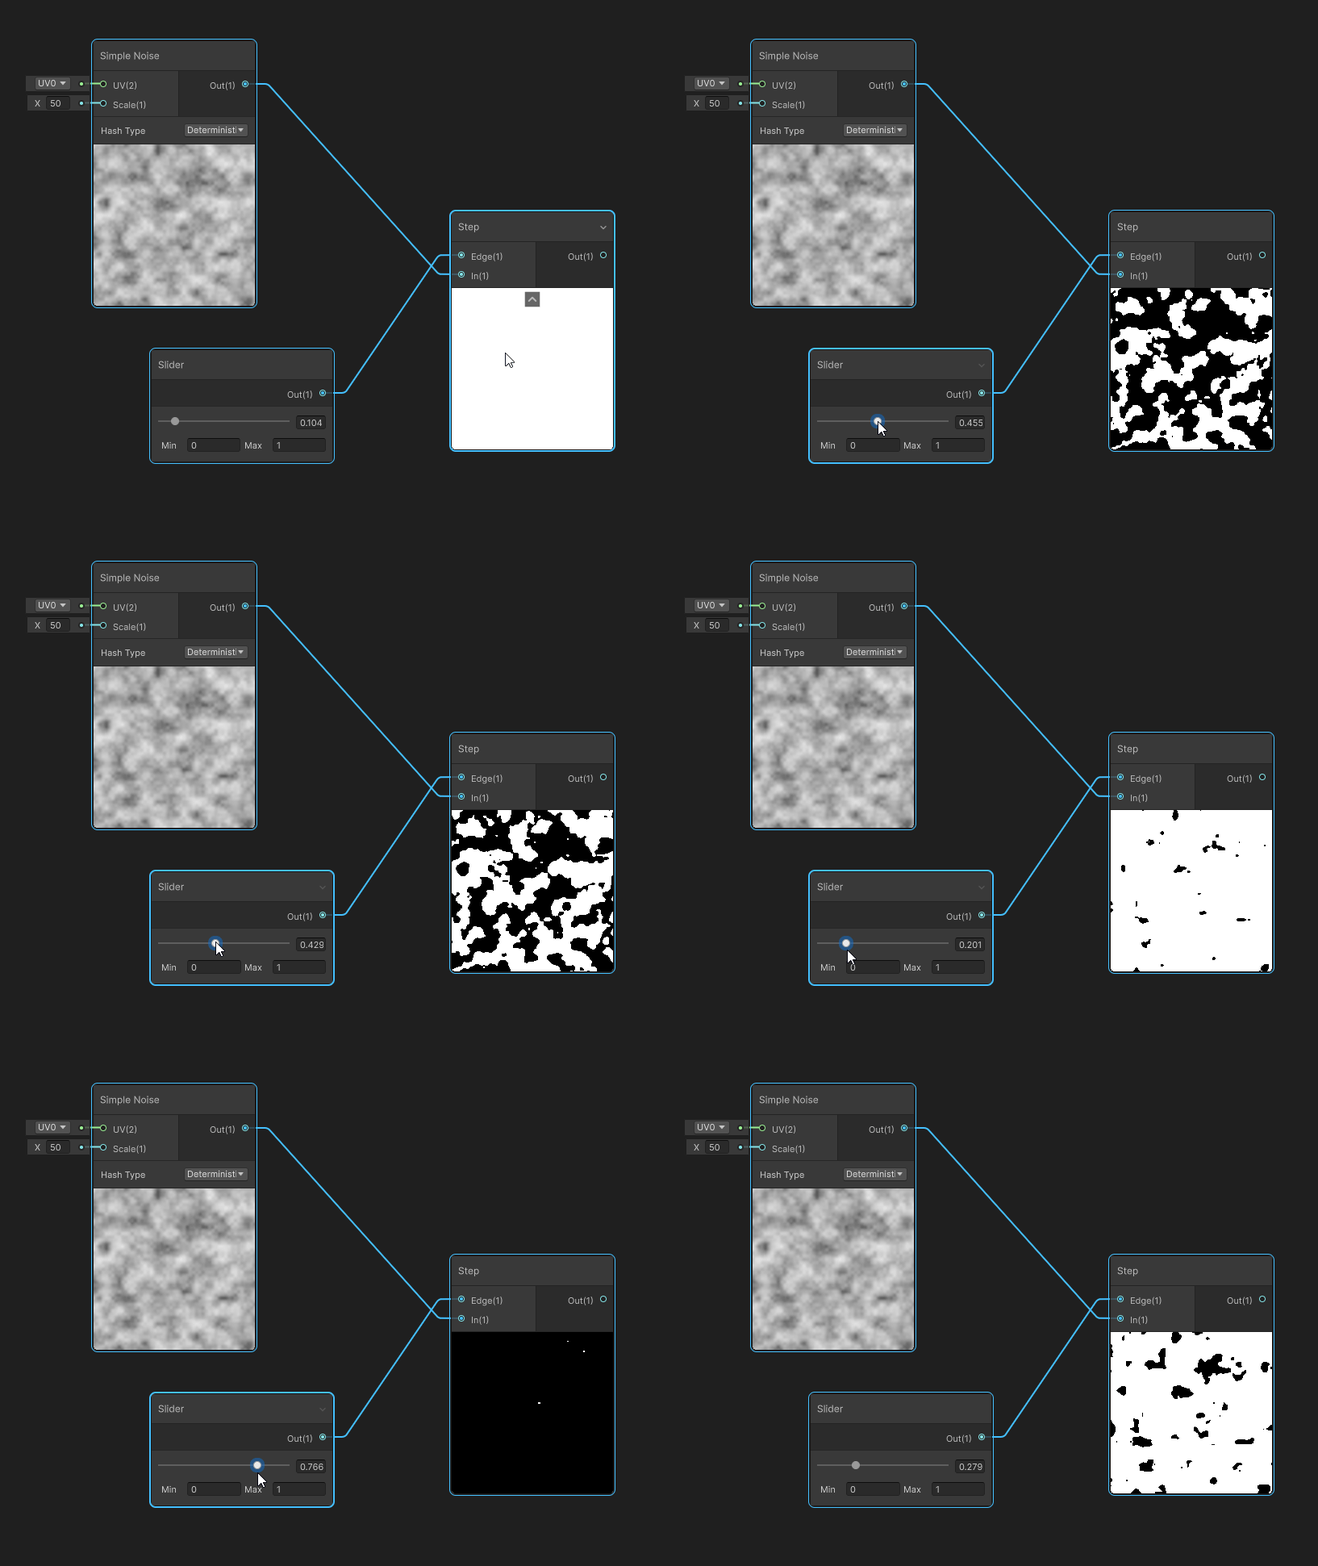
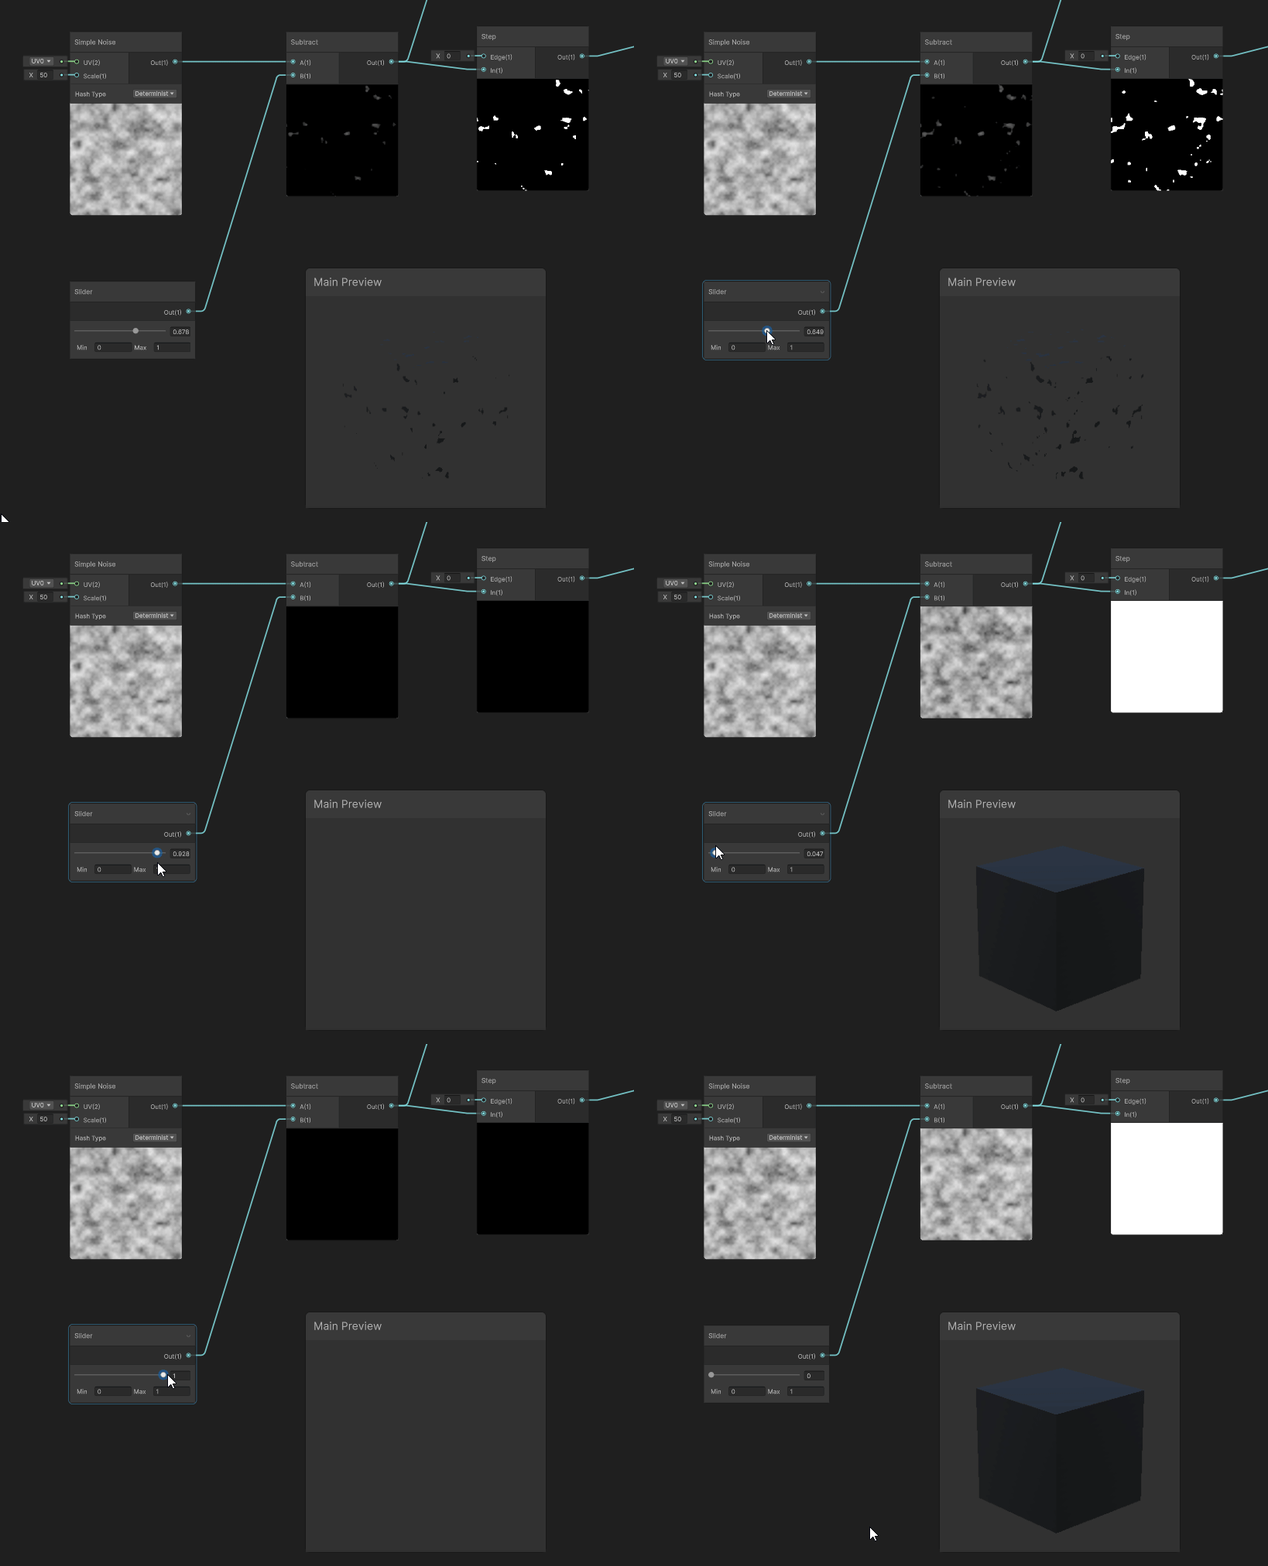
<p>Step node returns 1 if in &gt; then the edge value otherwise 0. This can be a great way of developing masks. 
For example:</p>
<ul>
  <li>if the input is 0.4 and the edge value is 0.5 then it will return 0.</li>
  <li>if the input is 0.6 and the edge value is 0.5 then it will return 1.</li>
</ul>

\[\text{step} = \left\{ \begin{array}{cl}
1 &amp; : \ \text{In} \geq \text{Edge}  \\
0 &amp; : \ \text{In} &lt; \text{Edge}
\end{array} \right.\]

<p><img src="/assets/images/2026-06-xray-effect/step-node.gif" alt="Step Node" /></p>

<p>We can develop an interesting alpha clip with this, creating a bit of a fade out effect.</p>

<p><img src="/assets/images/2026-06-xray-effect/step-node-cube-alpha.gif" alt="Step Node" /></p>

<h1 id="edge-effect">Edge Effect</h1>

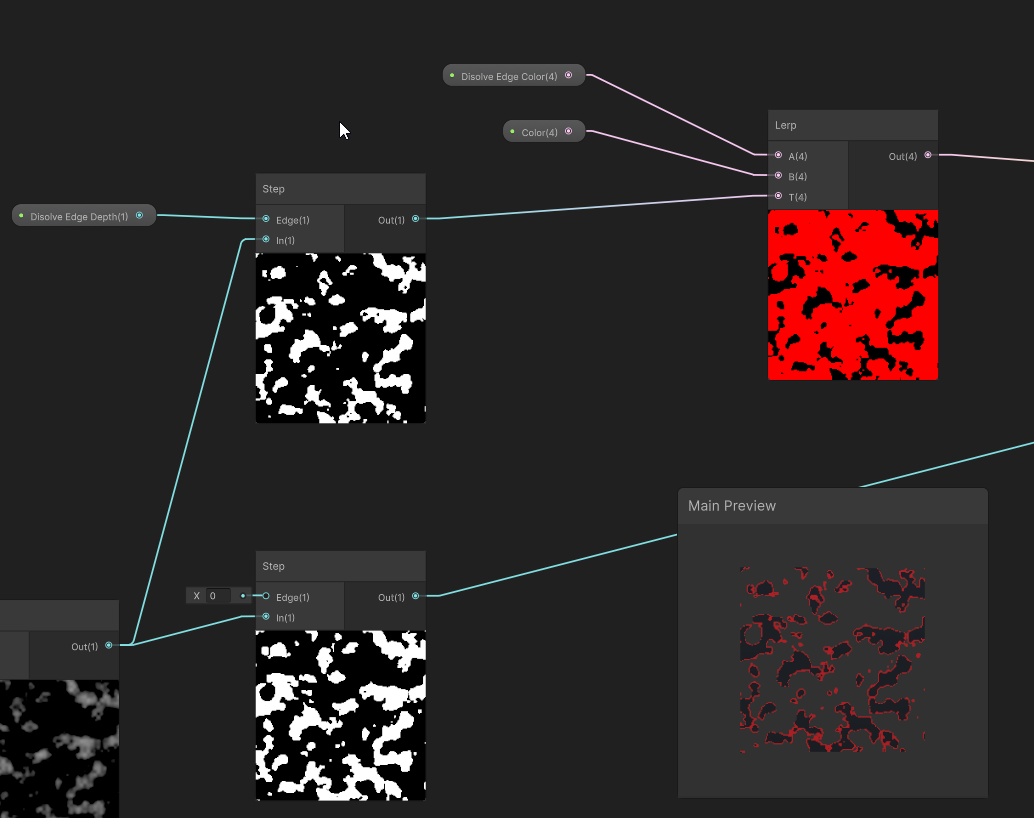
<p>Because the gradient is smooth, we can use it to also get a bit of an edge effect with the step node. 
This is a little subtle in the images.</p>

<p><img src="/assets/images/2026-06-xray-effect/xray-effect-outline.png" alt="Outline Effect" /></p>

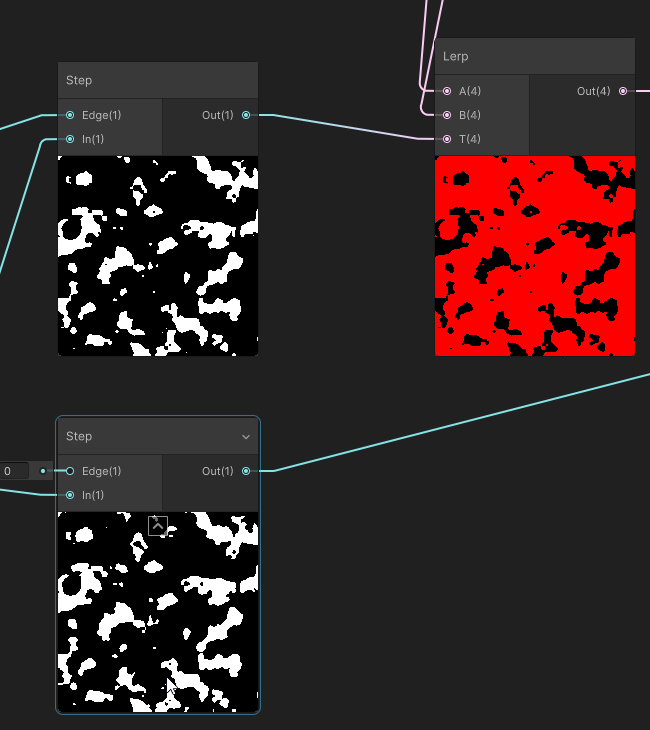
<p>The smooth gradient is important, without it the outline can’t exist. We are essentially using the smoothness to 
determine how thick the line edge is. Because both the line edge step function and the alpha clip step function are operating on the same input, the edge step function is just cutting away a little bit more than what the alpha clip is using. This little bit more is the edge effect size.</p>

<p>Another way to think about it is to think we are developing a mask with the step node that defines where the base color is. The edge will be everywhere else.</p>

<p><img src="/assets/images/2026-06-xray-effect/step-edge-outline.png" alt="Outline Effect" /></p>

<h2 id="different-types-of-noise---gradient-noise">Different Types of Noise - Gradient Noise</h2>
<div class="video-container" style="margin: 1.5rem 0; width: 100%;">
  <!-- <video controls  preload="metadata"> -->
  <video controls="" muted="" playsinline="" style="width: 100%; max-width: 720px; display: block; margin: 0 auto;">
    <source src="/assets/images/2026-06-xray-effect/alternative-noise-gradient.mp4" type="video/mp4" />
    Your browser does not support the video tag.
  </video>
  
    <p class="video-caption" style="text-align: center; font-style: italic; font-size: 0.9rem; margin-top: 0.5rem; color: #666;">
      Demonstration of the gradient noise
    </p>
  
</div>

<h2 id="different-types-of-noise---voronoi">Different Types of Noise - Voronoi</h2>
<div class="video-container" style="margin: 1.5rem 0; width: 100%;">
  <!-- <video controls  preload="metadata"> -->
  <video controls="" muted="" playsinline="" style="width: 100%; max-width: 720px; display: block; margin: 0 auto;">
    <source src="/assets/images/2026-06-xray-effect/alternative-noise-vornoi.mp4" type="video/mp4" />
    Your browser does not support the video tag.
  </video>
  
    <p class="video-caption" style="text-align: center; font-style: italic; font-size: 0.9rem; margin-top: 0.5rem; color: #666;">
      Demonstration of the voronoi noise
    </p>
  
</div>

<h1 id="properties">Properties</h1>

<table>
  <thead>
    <tr>
      <th>Property</th>
      <th>Reference</th>
      <th>Type</th>
      <th>Range</th>
    </tr>
  </thead>
  <tbody>
    <tr>
      <td>Color</td>
      <td>_Color</td>
      <td>Color</td>
      <td>NA</td>
    </tr>
    <tr>
      <td>Dissolve Edge Color</td>
      <td>_Dissolve_Edge_Color</td>
      <td>Color</td>
      <td>NA</td>
    </tr>
    <tr>
      <td>Dissolve Progress</td>
      <td>_Dissolve_Progress</td>
      <td>Float</td>
      <td>0..1</td>
    </tr>
    <tr>
      <td>Dissolve Edge Depth</td>
      <td>_Dissolve_Edge_Depth</td>
      <td>Float</td>
      <td>0..1</td>
    </tr>
  </tbody>
</table>

<h1 id="links">Links</h1>
<ul>
  <li><a href="">https://docs.unity3d.com/Packages/com.unity.shadergraph@6.9/manual/Step-Node.html</a></li>
  <li><a href="">https://docs.unity3d.com/Packages/com.unity.shadergraph@6.9/manual/Lerp-Node.html</a></li>
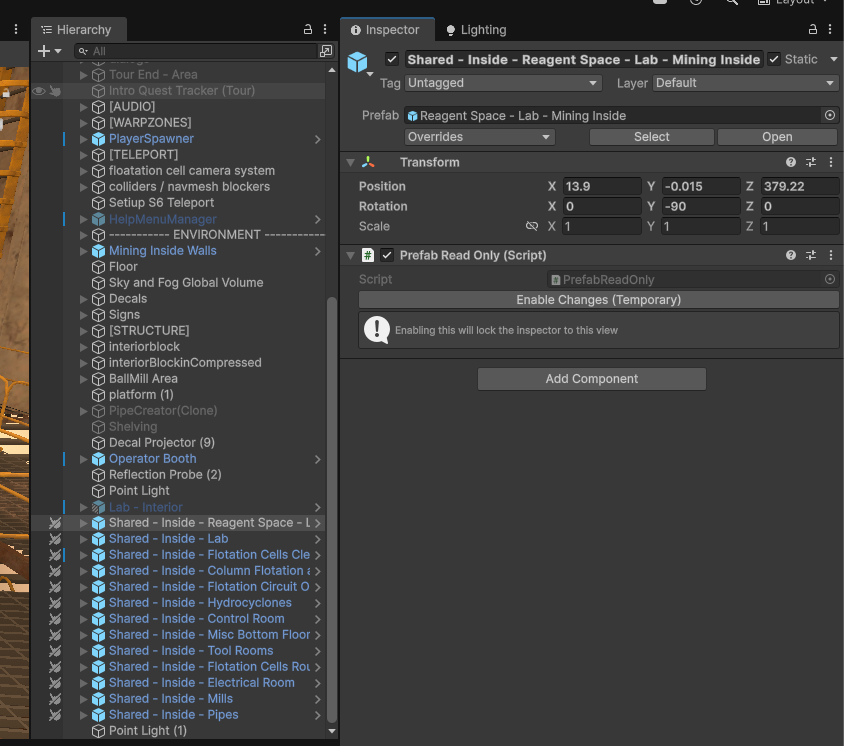
</ul>]]></content><author><name></name></author><category term="unity" /><category term="unity-shader-graph" /><category term="node-step" /><category term="node-lerp" /><category term="shader" /><summary type="html"><![CDATA[The effect]]></summary></entry><entry><title type="html">Read Only Prefabs in Unity</title><link href="/posts/read-only-prefabs/" rel="alternate" type="text/html" title="Read Only Prefabs in Unity" /><published>2026-03-24T00:00:00+00:00</published><updated>2026-03-24T00:00:00+00:00</updated><id>/posts/read-only-prefabs</id><content type="html" xml:base="/posts/read-only-prefabs/"><![CDATA[<p>The readonly prefab utility prevents accidental prefab changes. It does a few key things:
Stops accidental changes to existing items
Makes items not selectable to prevent accidental movements and other selection based issues
Reverts changes automatically with a reported error
Provides functionality to enable changes
Additionally allows editing in the open prefab mode</p>

<p>Once this system is in place you can have reasonable confidence that the prefabs are not being altered, the settings are remaining in place. This allows for people to alter the prefabs without having to consider issues like setting overrides or scene based links breaking. This ends up being a more robust prefab because you have enhanced guarantees that it is not being modified in many different ways. To enable prefab overrides a top level script can be used to act on the prefab at runtime.</p>

<p><img src="/assets/images/2026-03-readonly-prefab-1.png" alt="ReadOnly Prefab" /></p>

<p>Here is an animation of the read only behaviour being triggered:</p>
<iframe width="560" height="315" src="https://www.youtube.com/embed/xkAAGEHR3gA?si=KSILLIH5SnAdOFIi" title="YouTube video player" frameborder="0" allow="accelerometer; autoplay; clipboard-write; encrypted-media; gyroscope; picture-in-picture; web-share" referrerpolicy="strict-origin-when-cross-origin" allowfullscreen=""></iframe>

<p>And here is the flow for altering a prefab:</p>
<iframe width="560" height="315" src="https://www.youtube.com/embed/Om5GDRJz4oE?si=gZ9fgtbAHrDqE_72" title="YouTube video player" frameborder="0" allow="accelerometer; autoplay; clipboard-write; encrypted-media; gyroscope; picture-in-picture; web-share" referrerpolicy="strict-origin-when-cross-origin" allowfullscreen=""></iframe>]]></content><author><name></name></author><summary type="html"><![CDATA[The readonly prefab utility prevents accidental prefab changes. It does a few key things: Stops accidental changes to existing items Makes items not selectable to prevent accidental movements and other selection based issues Reverts changes automatically with a reported error Provides functionality to enable changes Additionally allows editing in the open prefab mode]]></summary></entry><entry><title type="html">Switching between a VR and Desktop configuration with a ScriptableObject</title><link href="/posts/building-vr-and-desktop/" rel="alternate" type="text/html" title="Switching between a VR and Desktop configuration with a ScriptableObject" /><published>2021-06-16T00:00:00+00:00</published><updated>2021-06-16T00:00:00+00:00</updated><id>/posts/building-vr-and-desktop</id><content type="html" xml:base="/posts/building-vr-and-desktop/"><![CDATA[<p>We wanted to build a single project experience that included first class support for VR and at the same time worked well in a desktop environment.</p>

<h2 id="builds">Builds</h2>
<p>We decided on having dedicated builds for desktop and VR. We wanted the ability to turn off VR. To do this we needed a couple of things.</p>

<ol>
  <li>Some way of configuring the project to be in VR or Desktop mode.</li>
  <li>A way for the project to know what mode it was in and spawn correct player prefab</li>
  <li>Unload VR related loaders.</li>
</ol>

<h2 id="configuration">Configuration</h2>
<p>Configuration is handled by a <a href="https://docs.unity3d.com/Manual/class-ScriptableObject.html">ScriptableObject</a> that looks something like the following:</p>

<div class="language-cs highlighter-rouge"><div class="highlight"><pre class="highlight"><code><span class="p">[</span><span class="n">CreateAssetMenu</span><span class="p">]</span>
<span class="k">public</span> <span class="k">class</span> <span class="nc">GlobalConfiguration</span> <span class="p">:</span> <span class="n">ScriptableObject</span>
<span class="p">{</span>
    <span class="p">[</span><span class="n">HideInInspector</span><span class="p">]</span>
    <span class="k">public</span> <span class="kt">bool</span> <span class="n">useVR</span><span class="p">;</span>

    <span class="k">public</span> <span class="k">void</span> <span class="nf">TurnVROn</span><span class="p">()</span>
    <span class="p">{</span>
        <span class="c1">// ...</span>
    <span class="p">}</span>

    <span class="k">public</span> <span class="k">void</span> <span class="nf">TurnVROff</span><span class="p">()</span>
    <span class="p">{</span>
        <span class="c1">// ...</span>
    <span class="p">}</span>
<span class="p">}</span>
</code></pre></div></div>

<p>A custom inspector is used to introduce a button that will trigger the TurnVROn and TurnVROff functions.</p>

<h2 id="configuring-vr-loaders">Configuring VR Loaders</h2>

<p>The following chunk of code will assign a loader.</p>
<div class="language-cs highlighter-rouge"><div class="highlight"><pre class="highlight"><code><span class="n">XRGeneralSettingsPerBuildTarget</span> <span class="n">buildTargetSettings</span> <span class="p">=</span> <span class="k">null</span><span class="p">;</span>
<span class="n">EditorBuildSettings</span><span class="p">.</span><span class="nf">TryGetConfigObject</span><span class="p">(</span><span class="n">XRGeneralSettings</span><span class="p">.</span><span class="n">k_SettingsKey</span><span class="p">,</span> <span class="k">out</span> <span class="n">buildTargetSettings</span><span class="p">);</span>
<span class="n">XRGeneralSettings</span> <span class="n">settings</span> <span class="p">=</span> <span class="n">buildTargetSettings</span><span class="p">.</span><span class="nf">SettingsForBuildTarget</span><span class="p">(</span><span class="n">BuildTargetGroup</span><span class="p">.</span><span class="n">Standalone</span><span class="p">);</span>      
<span class="n">XRPackageMetadataStore</span><span class="p">.</span><span class="nf">AssignLoader</span><span class="p">(</span><span class="n">settings</span><span class="p">.</span><span class="n">Manager</span><span class="p">,</span> <span class="k">typeof</span><span class="p">(</span><span class="n">Unity</span><span class="p">.</span><span class="n">XR</span><span class="p">.</span><span class="n">OpenVR</span><span class="p">.</span><span class="n">OpenVRLoader</span><span class="p">).</span><span class="n">FullName</span><span class="p">,</span> <span class="n">BuildTargetGroup</span><span class="p">.</span><span class="n">Standalone</span><span class="p">);</span>
</code></pre></div></div>

<p>Lets break down each of the lines.</p>

<ol>
  <li>
    <p><code class="language-plaintext highlighter-rouge">XRGeneralSettingsPerBuildTarget buildTargetSettings = null;</code></p>

    <p>We are creating a variable to store our XRGeneralSettingsPerBuildTarget in.</p>
  </li>
  <li>
    <p><code class="language-plaintext highlighter-rouge">EditorBuildSettings.TryGetConfigObject(XRGeneralSettings.k_SettingsKey, out buildTargetSettings);</code></p>

    <p>Retrieve the build target settings and store them into <code class="language-plaintext highlighter-rouge">buildTargetSettings</code>.</p>
  </li>
  <li>
    <p><code class="language-plaintext highlighter-rouge">XRGeneralSettings settings = buildTargetSettings.SettingsForBuildTarget(BuildTargetGroup.Standalone);</code></p>

    <p>Get the XR settings for the Standalone (<code class="language-plaintext highlighter-rouge">BuildTargetGroup.Standalone</code>) build.</p>
  </li>
  <li>
    <p><code class="language-plaintext highlighter-rouge">XRPackageMetadataStore.AssignLoader(settings.Manager, typeof(Unity.XR.OpenVR.OpenVRLoader).FullName, BuildTargetGroup.Standalone);</code></p>

    <p>Turn the OpenVRLoader on.</p>
  </li>
</ol>

<p>If we focus on line 4, we could also do <code class="language-plaintext highlighter-rouge">XRPackageMetadataStore.RemoveLoader(...)</code> to remove a loader.</p>

<p>Other types of loaders can be removed / added by changing the loader type from OpenVR to whatever loader is being used.</p>

<p>See also:</p>
<ul>
  <li><a href="https://docs.unity3d.com/Packages/com.unity.xr.management@3.2/api/UnityEditor.XR.Management.Metadata.XRPackageMetadataStore.html">Unity XR Management Documentation</a></li>
</ul>

<h2 id="prefab-management">Prefab Management</h2>

<p>Prefab management is fairly straightforward. Simply have a PlayerSpawner that will look at the <code class="language-plaintext highlighter-rouge">globalconfiguration.useVR</code> value and spawn either a VR prefab or a Desktop prefab depending on the scenario. When the prefab is spawned a game event is triggered to let the scene know so it can self-configure from there.</p>]]></content><author><name></name></author><category term="unity" /><summary type="html"><![CDATA[We wanted to build a single project experience that included first class support for VR and at the same time worked well in a desktop environment.]]></summary></entry><entry><title type="html">Voxelizer</title><link href="/posts/voxelization/" rel="alternate" type="text/html" title="Voxelizer" /><published>2021-06-10T00:00:00+00:00</published><updated>2021-06-10T00:00:00+00:00</updated><id>/posts/voxelization</id><content type="html" xml:base="/posts/voxelization/"><![CDATA[<p>A voxelization study. Supports placing, removing and streaming.</p>

<p><a href="/assets/voxelizer/index.html">Live demo</a></p>]]></content><author><name></name></author><summary type="html"><![CDATA[A voxelization study. Supports placing, removing and streaming.]]></summary></entry><entry><title type="html">Wolf Rabbit Simulation</title><link href="/posts/wolf-rabbit/" rel="alternate" type="text/html" title="Wolf Rabbit Simulation" /><published>2020-11-15T00:00:00+00:00</published><updated>2020-11-15T00:00:00+00:00</updated><id>/posts/wolf-rabbit</id><content type="html" xml:base="/posts/wolf-rabbit/"><![CDATA[<p>An agent study where wolfs are hunting rabbits. What populations win? How do they get to a stable point?</p>

<p><a href="/assets/loife/index.html">Live demo</a></p>]]></content><author><name></name></author><summary type="html"><![CDATA[An agent study where wolfs are hunting rabbits. What populations win? How do they get to a stable point?]]></summary></entry><entry><title type="html">Agent Based Life Simulation</title><link href="/posts/agent-simulation/" rel="alternate" type="text/html" title="Agent Based Life Simulation" /><published>2020-11-10T00:00:00+00:00</published><updated>2020-11-10T00:00:00+00:00</updated><id>/posts/agent-simulation</id><content type="html" xml:base="/posts/agent-simulation/"><![CDATA[<p><a href="/assets/pandemic/index.html">A agent based simulation allowing exploration of different variables!</a></p>]]></content><author><name></name></author><summary type="html"><![CDATA[A agent based simulation allowing exploration of different variables!]]></summary></entry><entry><title type="html">One Day Racing Game</title><link href="/posts/one-day-racing-game/" rel="alternate" type="text/html" title="One Day Racing Game" /><published>2020-11-05T00:00:00+00:00</published><updated>2020-11-05T00:00:00+00:00</updated><id>/posts/one-day-racing-game</id><content type="html" xml:base="/posts/one-day-racing-game/"><![CDATA[<p>
    <a href="/assets/RaceForLoife/index.html">A one day challenge for a racing game!</a>
</p>]]></content><author><name></name></author><summary type="html"><![CDATA[A one day challenge for a racing game!]]></summary></entry></feed>