Unity Outline Shader
Outline Shader
Adding outlines to 3D objects is a classic way to give your game a stylized, cell-shaded, or comic-book aesthetic. It’s also incredibly useful for UX cues, like highlighting interactable objects or indicating selection. But as simple as the effect looks, there are actually a few different ways to build it under the hood—each with its own trade-offs in performance, complexity, and visual artifacts. In this post, we’ll walk through three common approaches: the Inverted Hull and Fresnel/Rim lighting.
Inverted Hull outline shader
The Inverted Hull method is arguably the most common way to draw sharp, clean outlines on individual objects. It works entirely within standard geometry passes and doesn’t require any post-processing setup or screen-space buffers. The trick is simple: we render the mesh in two passes. In the first pass, we draw the model normally. In the second pass, we cull the front faces (drawing only the back faces), push the vertices outward, and color them with a solid color.
While this is incredibly easy to develop and runs on almost any hardware, it does have a cost. Because it renders the mesh twice, it effectively doubles your geometry count and draw calls for that object. It also has a habit of rendering outline artifacts inside non-convex shapes, which we’ll look at in a moment.
Scaling
The simplest way to create that expanded “hull” for the second pass is by scaling the vertices outward relative to the model’s pivot point. We can implement this in a basic vertex shader like this:
  Varyings vert(Attributes IN)
  {
      Varyings OUT;

      float3 newPosition = IN.positionOS.xyz * _Size;
      OUT.positionHCS = TransformObjectToHClip(newPosition);

      return OUT;
  }


  half4 frag(Varyings IN) : SV_Target
  {
      return _BaseColor;
  }
In this vertex program, IN.positionOS represents the raw vertex position in object space. We multiply this position by a scaling factor, _Size. Since we need the hull to be slightly larger than the original mesh to peek out from behind it, _Size needs to be greater than 1.0. Any value of 1.0 or less will shrink the hull inside the mesh, rendering it completely invisible. Mathematically, we can think of the domain for this scale multiplier as $(1.0, \infty)$.
Here is the outline effect generated by this scaling method:
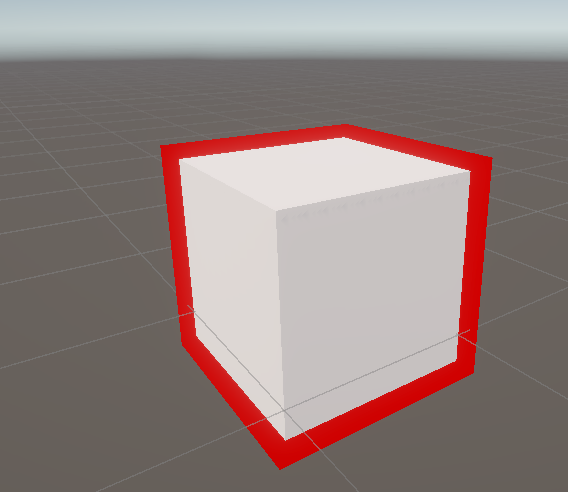
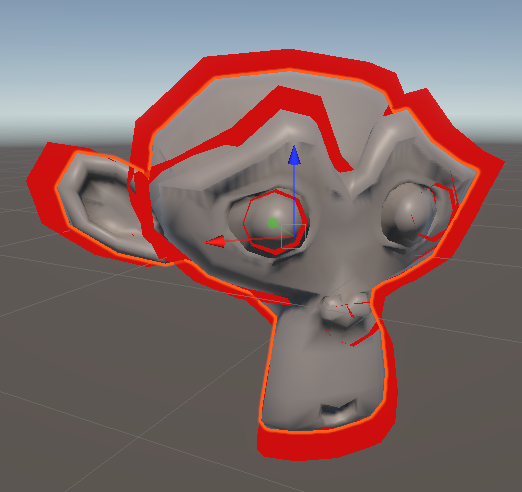
While it works reasonably well for simple, symmetrical models centered perfectly on their pivots, the scaling method quickly falls apart on more complex geometry. If we look closely at the cylinder or non-uniform meshes, we see that the outline thickness varies wildly depending on how far a vertex is from the object’s origin. Even worse, we get messy interior outlines where parts of the scaled mesh intersect with itself:
Using Normals with Multiplier
To fix the uneven thickness caused by basic scaling, we can extrude the vertices along their normals instead of scaling them relative to the pivot. This ensures that the vertex is pushed outward perpendicularly to the mesh surface, keeping the outline uniform regardless of the shape’s proportions.
  Varyings vert(Attributes IN)
  {
      Varyings OUT;

      float3 newPosition = IN.positionOS.xyz + IN.normalOS * _Size;
      OUT.positionHCS = TransformObjectToHClip(newPosition);

      return OUT;
  }

  half4 frag(Varyings IN) : SV_Target
  {
      return _BaseColor;
  }
In this version, we take the object-space position and add the object-space normal (IN.normalOS) multiplied by our thickness variable _Size. The result is a much more consistent, reliable outline on complex meshes.
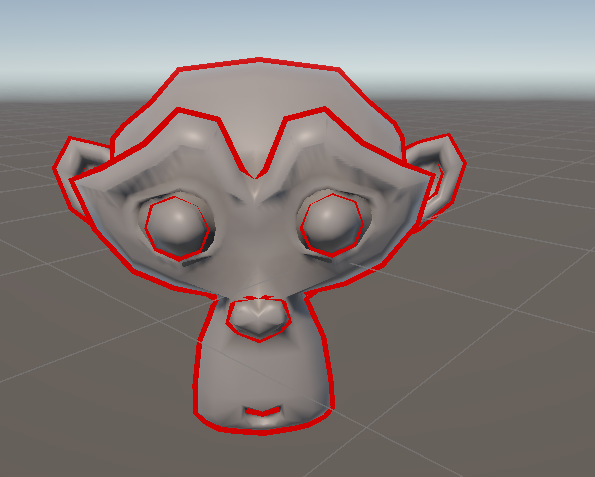
Here is the result of using vertex normals on a more complex shape. Notice how the outline maintains a uniform width all the way around:
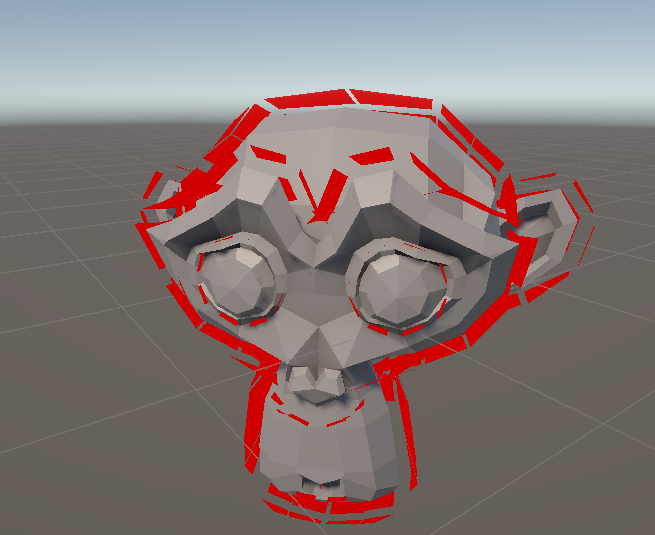
However, there is a major gotcha to watch out for when using normal-based extrusion: your mesh shading settings matter. For the normals to push the vertices in a cohesive way, the mesh must be set to “Shade Smooth” in your 3D modeling tool (like Blender). If the mesh uses flat shading, vertices along edges are split, meaning they have different normals pointing in different directions. When the shader pushes them outward, they split apart, tearing the outline open and leaving visible gaps:
Issues with Inverted Hulls
Even with smooth normals, both flavors of inverted hull shader suffer from a shared limitation: internal overlap artifacts. Because the second pass is just rendering backfaces, any concave geometry (like a joint, character limbs, or deep indentations) will project its expanded backfaces in front of other parts of the mesh. This creates unwanted outline lines slicing through the middle of the object:
While you can mitigate this using stencil buffers to mask out the original mesh’s silhouette from the outline pass, it adds complexity to your rendering pipeline.
Fresnel / Rim Light Shaders
If you want an outline-like highlight but want to avoid the performance cost of rendering geometry twice, you can mimic the effect using a Fresnel (or rim lighting) shader. Instead of extruding geometry, this shader calculates lighting based on the angle between the camera’s view direction and the surface normals.
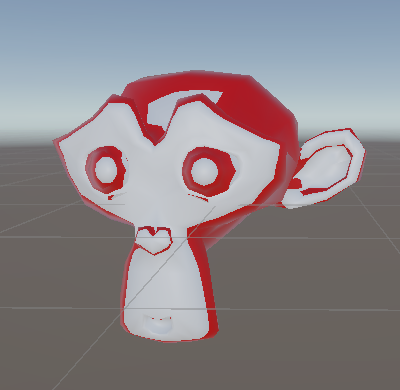
The primary benefit here is efficiency: the geometry is not duplicated, making it a single-pass shader that is highly friendly to mobile and VR hardware. It is especially common for sci-fi shields, holographic effects, or items that are supposed to have a soft, ethereal glow.
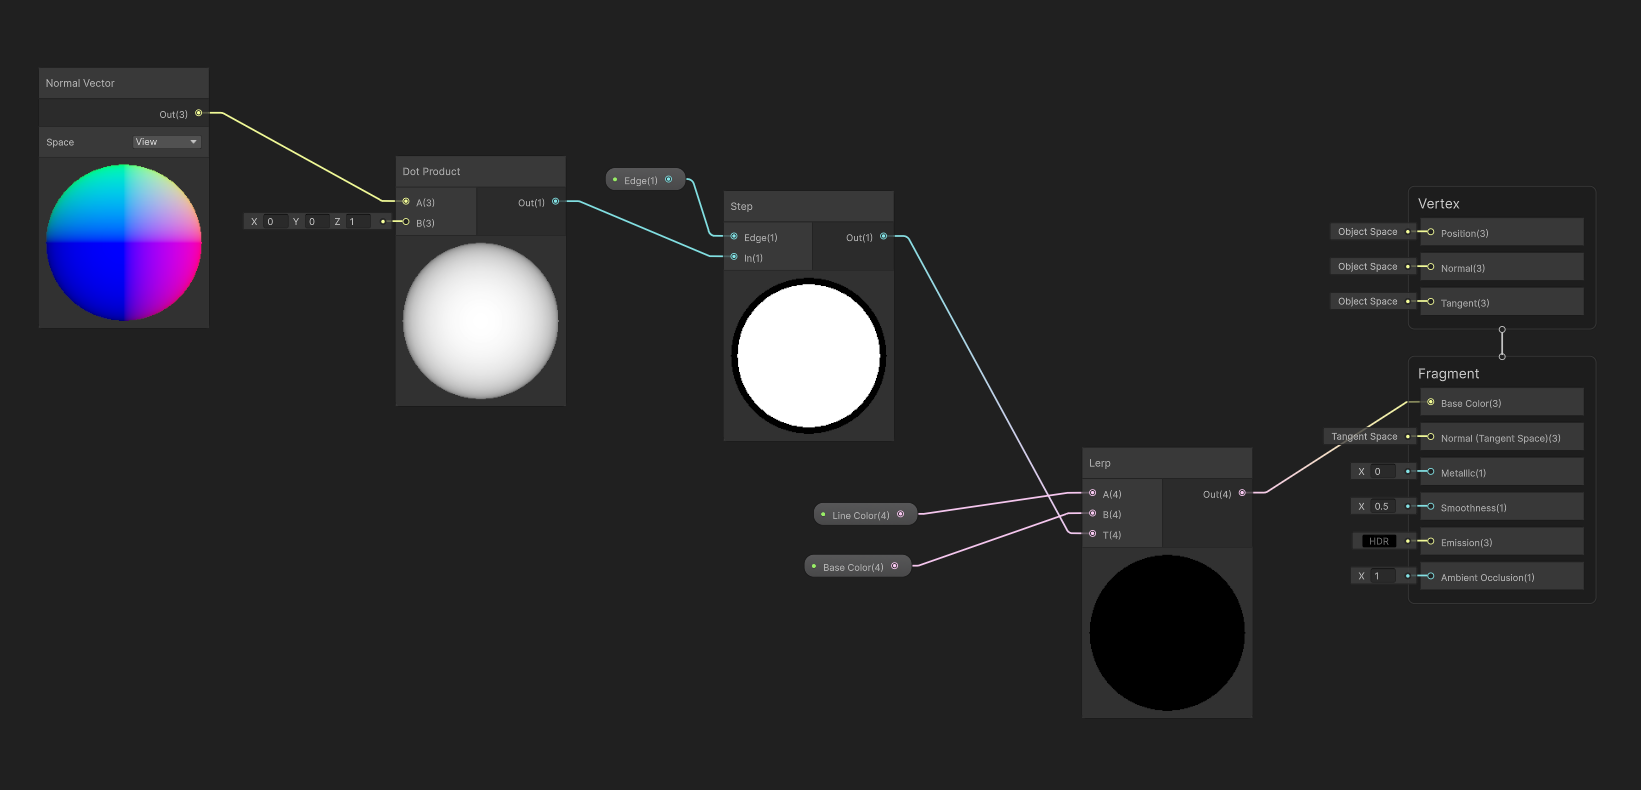
We can easily build this in Unity Shader Graph by taking the dot product of the View Direction and Normal Vector, subtracting it from 1 to invert it, and raising it to a power to control the falloff.
The downside is that Fresnel doesn’t produce a “true” outline. It is highly dependent on the viewing angle, meaning it will fade out on flat surfaces facing the camera and looks more like an inner glow than a crisp outer boundary. On a cube, for example, it won’t produce a clean outline along the sharp edges.
Post-processing / Screen-space (Sobel)
For complex scenes where you need pixel-perfect outlines around everything—including intersections between different objects—you have to move to screen-space. This is done as a post-processing pass, typically using a Sobel filter.
The Sobel shader analyzes the rendered frame’s depth buffer, normal buffer, or color buffer, searching for sharp changes (discontinuities) in value. Wherever a sudden jump in depth or a sharp shift in normal direction is found, the shader draws an outline pixel.
While we won’t be diving deep into the implementation details in this article, this method is the gold standard for full-screen stylized games (like Sable or Borderlands). It keeps geometry counts low and gives you absolute control over line thickness in screen space, but it does require setting up custom render passes and can be heavier on fill-rate performance.